It has been a long time since I have posted anything new - sorry about that.
Work hasn't left me much time to cook and I was asked for a 4th Doctor scarf, so I've been working on that.
I have a whole bunch of photos of past projects I need to upload, so look out for those in the next week.
New projects, mostly crafting, to come in the near future. Mostly sewing projects.
Thanks for sticking around!
Saturday, November 26, 2011


Wednesday, August 17, 2011
Fleece Blanket
For my sister's birthday, part of my gift to her was a home sewn blanket.
We were at Hancock's Fabric and she found a dinosaur printed fleece she liked, so I offered to make something out of it. I have a flannel blanket with a silky border, which needs repairs it is so old, and she asked for a blanket like that.
Unfortunately, I forgot to take progress pictures, but I plan on making another one around Christmas. Then I'll remember the progress photos... hopefully.

Fleece Blanket:
1.5 yards of fleece or flannel
2 packages of blanket binding/border
Thread matching blanket binding
Sewing Machine
I did an extremely simple blanket. I had 1.5 yards of my sister's chosen fabric cut. I left it in the shape it was in from the store - my sister approved of the shape, since it was large enough to cover her.
I purchased blanket binding in a color that went with the colors in the fabric; I purchased only one package at first, but found later that I needed two. My process for attaching the binding will be different on my next blanket.
Construction:
1) Lay out the fabric so it is flat. Iron flannel if necessary, be careful with fleece - it can burn
2) Pin binding to fabric. Make sure not to bunch fabric or pull to tight. The fold of the binding should match up and touch the edge of the fabric, so all the binding is on top of fabric.
Instructions I found say start pinning on a side not a corner, but I don't really like the look of a seem in the middle. I haven't tried starting at a corner, so I can't honestly suggest it.
3) Corners take a little practice. I'll post how to pictures next time since I'm sure my instructions won't be clear. Anyway, on both sides of the blanket, fold fabric over so it makes a point over the corners point. There will be a fold line down the middle of the corner. Doing this on one side should cause the other side to do the same thing, but, if not, then repeat.
4) Finish pinning all the way around
5) Sew the binding on. I used a normal straight stitch, but I meant to use a zig-zag stitch to keep the edge of the binding from flapping up. My sister didn't care, so I kept the straight stitch at 1/4 inch from the edge of the binding.

We were at Hancock's Fabric and she found a dinosaur printed fleece she liked, so I offered to make something out of it. I have a flannel blanket with a silky border, which needs repairs it is so old, and she asked for a blanket like that.
Unfortunately, I forgot to take progress pictures, but I plan on making another one around Christmas. Then I'll remember the progress photos... hopefully.

Fleece Blanket:
1.5 yards of fleece or flannel
2 packages of blanket binding/border
Thread matching blanket binding
Sewing Machine
I did an extremely simple blanket. I had 1.5 yards of my sister's chosen fabric cut. I left it in the shape it was in from the store - my sister approved of the shape, since it was large enough to cover her.
I purchased blanket binding in a color that went with the colors in the fabric; I purchased only one package at first, but found later that I needed two. My process for attaching the binding will be different on my next blanket.
Construction:
1) Lay out the fabric so it is flat. Iron flannel if necessary, be careful with fleece - it can burn
2) Pin binding to fabric. Make sure not to bunch fabric or pull to tight. The fold of the binding should match up and touch the edge of the fabric, so all the binding is on top of fabric.
Instructions I found say start pinning on a side not a corner, but I don't really like the look of a seem in the middle. I haven't tried starting at a corner, so I can't honestly suggest it.
3) Corners take a little practice. I'll post how to pictures next time since I'm sure my instructions won't be clear. Anyway, on both sides of the blanket, fold fabric over so it makes a point over the corners point. There will be a fold line down the middle of the corner. Doing this on one side should cause the other side to do the same thing, but, if not, then repeat.
4) Finish pinning all the way around
5) Sew the binding on. I used a normal straight stitch, but I meant to use a zig-zag stitch to keep the edge of the binding from flapping up. My sister didn't care, so I kept the straight stitch at 1/4 inch from the edge of the binding.

When I revive my camera, I will take pictures of the corners. Then I will add a better how-to for blanket binding corners.
I won't be cooking much in the near future due to my work hours, but I do have some past sewing and crafts I am going to try to post more regularly. I also found this great knitting book, so I have that to work on as well as my Halloween costume.
Sunday, July 17, 2011
Cute Fabric Bows
I have an obsession with cute things, especially accessories, clothes, and fabrics.
Bows fall in that category. This is what led me to making my own bows out of my fabric scraps.
Sewing bows is actually much easier than it might seem; at least I thought it would be harder.

Above are the bows I have made so far. The argyle and brown/tan bows were the first two I made. The fabric is a little loose around the middle, but practice makes perfect.
The bows don't have anything attached to them, which makes them a versatile accessory. You can slip a bobby pin through the fabric loop for a hair bow or use a safety pin to attach the bow to a bag or outfit.
To make the bows I went through a process similar to that of making a tiny pillow except, after flipping the fabric pouch right-side out, I sewed the hole closed without filling the pouch will fluff.
The square/rectangle was then folded or scrunched and sewed down in the middle in order to get the bow shape. Lastly, a thin piece of fabric was wrapped and sewn around the middle of the bow.
There are real tutorials and patterns around the net. The patterns range in materials and skill level required - there are even no-sew an minimum sewing tutorials - so find the tutorial that is right for you if you are interested in the little DIY project.
In the future, after some more practice, I might try selling these with some of my other craft projects. I'm going to try adding details - like button charms, lace, ruffles, etc. - in order to create different styles.
Speaking of details...
I went craft supply shopping a couple times this week. There were sales and coupons that demanded my attention.
I came out with a decent haul that will help in my goal to create a crafting stock pile.
I'm looking forward to using my new supplies. So many possibilities.
I leave you with pictures of my bows in use:


Next time: Fleece blanket
Bows fall in that category. This is what led me to making my own bows out of my fabric scraps.
Sewing bows is actually much easier than it might seem; at least I thought it would be harder.

Above are the bows I have made so far. The argyle and brown/tan bows were the first two I made. The fabric is a little loose around the middle, but practice makes perfect.
The bows don't have anything attached to them, which makes them a versatile accessory. You can slip a bobby pin through the fabric loop for a hair bow or use a safety pin to attach the bow to a bag or outfit.
To make the bows I went through a process similar to that of making a tiny pillow except, after flipping the fabric pouch right-side out, I sewed the hole closed without filling the pouch will fluff.
The square/rectangle was then folded or scrunched and sewed down in the middle in order to get the bow shape. Lastly, a thin piece of fabric was wrapped and sewn around the middle of the bow.
There are real tutorials and patterns around the net. The patterns range in materials and skill level required - there are even no-sew an minimum sewing tutorials - so find the tutorial that is right for you if you are interested in the little DIY project.
In the future, after some more practice, I might try selling these with some of my other craft projects. I'm going to try adding details - like button charms, lace, ruffles, etc. - in order to create different styles.
Speaking of details...
I went craft supply shopping a couple times this week. There were sales and coupons that demanded my attention.
I came out with a decent haul that will help in my goal to create a crafting stock pile.
 |
| Fabric: Fleece, flannel, and felt. Rose fleece was on $2 a yard! |
 |
| New storage box and patterns ($1.99 yeah!) |
 |
| Crochet hooks, buttons, ribbon, thread, needles, and binding |
 |
| Up close view of my cute buttons |
I'm looking forward to using my new supplies. So many possibilities.
I leave you with pictures of my bows in use:
Next time: Fleece blanket
Friday, July 15, 2011
Striped Birthday Cake
I lied - more food!
It was my sister's birthday, so I made her cake. We came across this tutorial for making a vertical striped cake and thought we'd attempt it for her bday.
Since this was a new technique, I save myself some trouble and just used boxed cake mix and canned icing. I even bought Betty Crocker Cupcake Icing to decorate.
It didn't come out as nice as the tutorial because I am not an amazing baker. I'm good, but I don't have awesome skills.
First I made round cakes. My 2 boxes of mix made four 8 inch cakes, you will have 2 cakes or just extra cake at the end.
I used strawberry and chocolate cake.
After baking, removing from pans, and cutting off the tops to make the cake flat, I stacked cakes of the same flavor on top of each other (both strawberries together & chocolate together) and put them in the freezer to cool.
After freezing for a couple hours (3, I think), I took out the cakes and cut them into circles, so the cake looked like a bullseye. Next time I will make a proper template; for this first attempt I tried measuring, which didn't work out. I had a gap I had to fill because my measurements were a little off from one cake to the other.
After cutting, I switched alternating colors between the cakes. Now you have a bullseye with alternating colored rings. I wrapped the cake in saran wrap and put in the freezer to try and mold the cake together. That didn't really work, mostly because my circles didn't fit each other properly.
After an hour in the freezer, I took the cake out. If frozen, thaw cake in the refrigerator; if not (like mine), go ahead and add icing.
I spread on white icing as normal, but tried to add decoration with the Betty Crocker Cupcake Icing in pink. The Cupcake Icing is a whipped cream like can of icing. It comes with decorating tips, so you can try different designs. It worked okay. The tips worked perfectly and the icing tastes great; however, I had trouble stopping the flow of icing once it got started. This caused some extremely messy designing. Fortunately, the cake was tasted good enough for my sister to forgive the mess.
If I was to use that pressurized icing again, I would first have to figure out how to control the flow better.
Now for a bunch of pictures:
Decorated
The candles:
I found special "Rainbow Glow" candles at the grocery store. The burn colors!
Next time I try a cake pattern I am going to do a checkered sheet cake.
Next post will be crafty. I got a great haul from a craft store shopping out, so I'll be showing that off with some completed projects.
Then... probably more food in the near future. My friend and I want to have a Harry Potter themed baking day. The movie release has been quite inspiring!
It was my sister's birthday, so I made her cake. We came across this tutorial for making a vertical striped cake and thought we'd attempt it for her bday.
Since this was a new technique, I save myself some trouble and just used boxed cake mix and canned icing. I even bought Betty Crocker Cupcake Icing to decorate.
It didn't come out as nice as the tutorial because I am not an amazing baker. I'm good, but I don't have awesome skills.
First I made round cakes. My 2 boxes of mix made four 8 inch cakes, you will have 2 cakes or just extra cake at the end.
I used strawberry and chocolate cake.
After baking, removing from pans, and cutting off the tops to make the cake flat, I stacked cakes of the same flavor on top of each other (both strawberries together & chocolate together) and put them in the freezer to cool.
After freezing for a couple hours (3, I think), I took out the cakes and cut them into circles, so the cake looked like a bullseye. Next time I will make a proper template; for this first attempt I tried measuring, which didn't work out. I had a gap I had to fill because my measurements were a little off from one cake to the other.
After cutting, I switched alternating colors between the cakes. Now you have a bullseye with alternating colored rings. I wrapped the cake in saran wrap and put in the freezer to try and mold the cake together. That didn't really work, mostly because my circles didn't fit each other properly.
After an hour in the freezer, I took the cake out. If frozen, thaw cake in the refrigerator; if not (like mine), go ahead and add icing.
I spread on white icing as normal, but tried to add decoration with the Betty Crocker Cupcake Icing in pink. The Cupcake Icing is a whipped cream like can of icing. It comes with decorating tips, so you can try different designs. It worked okay. The tips worked perfectly and the icing tastes great; however, I had trouble stopping the flow of icing once it got started. This caused some extremely messy designing. Fortunately, the cake was tasted good enough for my sister to forgive the mess.
If I was to use that pressurized icing again, I would first have to figure out how to control the flow better.
Now for a bunch of pictures:
Decorated
 |
| The whole cake |
 |
| Border |
 |
| Details and sprinkles |
The inside:
 |
| The first piece served |
 |
| Half the cake |
The candles:
I found special "Rainbow Glow" candles at the grocery store. The burn colors!
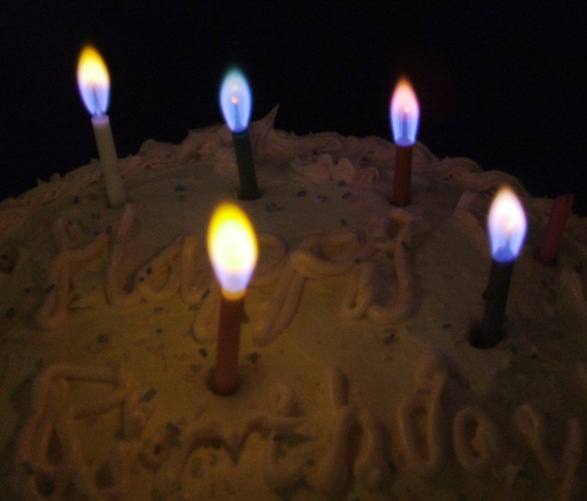 |
| Back row, L to R: White, Green, Red Front Row, L to R: Orange, Blue |
Next time I try a cake pattern I am going to do a checkered sheet cake.
Next post will be crafty. I got a great haul from a craft store shopping out, so I'll be showing that off with some completed projects.
Then... probably more food in the near future. My friend and I want to have a Harry Potter themed baking day. The movie release has been quite inspiring!
Sunday, July 10, 2011
Mousakka & Recipe Tips
I haven't written about cooking in a long time, so I'd do a small post.
Fun cooking has not been happening lately because I usually bake for fun, and there has been a constant supply of baked goods lately.
I did make Moussaka a couple of weeks ago. I absolutely love mousakka.
Moussaka is a dish made up of layers of eggplant and minced/ground meat as well as tomato paste or sauce. The is also, typically, a Bechamel sauce on top. There are multiple variations depending on the chef and origin of the recipe.
For my version of Moussaka, I mix recipes. Therefore, I do not have a recipe to share - sorry. I have compiled the parts of different recipes I use into one. I will do that next time though, it would probably be helpful and cut done cooking time, haha.
I remembered to take a picture of my finished product... of leftovers the next day. It isn't as pretty as when it came out of the over; plus, it isn't melty and gooey looking since it is cold.


It was delicious!
Since I have to recipe to share, I thought I'd share some tips for recipes.
1) Improvise if you feel comfortable - If you don't like something in the recipe or would like something added, do it. Recipes are a lot of testing and altering when you are trying a new one, so you might as well try the changes you'd like.
2) Check for seasoning in recipes: Sometimes recipes do not give you seasonings to use. Remember to add appropriate seasonings (salt, pepper, paprika, herbs) to your dishes. I have become so wrapped up in doing all the steps of a new recipe correctly that I forget salt & pepper because it wasn't listed. Don't make my mistake.
3) Finding info: Speaking of seasonings, you may be unsure what types to use if it isn't listed. Check your cook books, online, and even the herb/seasoning containers for helpful info. You can find info about what types of proteins go well with different herbs or what type of seasoning is found in certain types of cuisine.
4) Lastly, if you're not sure of the instructions while reading the recipe, look for other recipes or tutorials to supplement. One of my Moussaka recipes has confusing instructions for making the Bechamel sauce. Luckily, I use a Bechemal type process for my homemade mac & cheese, so I used those instructions. Some one out there will explain the instructions in a way that works for you. Everyone understands differently.
I hope some of those were helpful or made you see you aren't alone in not getting something right the first or knowing info on all sorts of techniques and spices.
More crafting in the future - if I can get motivated to iron and cut fabric. I love sewing; I dislike the prep.
I would really like to do an Artist Alley at a convention or have a booth at an art fair sometime in the future; however, I need to practice more and come up with more designs. So, that is what I'm working on now.
Fun cooking has not been happening lately because I usually bake for fun, and there has been a constant supply of baked goods lately.
I did make Moussaka a couple of weeks ago. I absolutely love mousakka.
Moussaka is a dish made up of layers of eggplant and minced/ground meat as well as tomato paste or sauce. The is also, typically, a Bechamel sauce on top. There are multiple variations depending on the chef and origin of the recipe.
For my version of Moussaka, I mix recipes. Therefore, I do not have a recipe to share - sorry. I have compiled the parts of different recipes I use into one. I will do that next time though, it would probably be helpful and cut done cooking time, haha.
I remembered to take a picture of my finished product... of leftovers the next day. It isn't as pretty as when it came out of the over; plus, it isn't melty and gooey looking since it is cold.


It was delicious!
Since I have to recipe to share, I thought I'd share some tips for recipes.
1) Improvise if you feel comfortable - If you don't like something in the recipe or would like something added, do it. Recipes are a lot of testing and altering when you are trying a new one, so you might as well try the changes you'd like.
2) Check for seasoning in recipes: Sometimes recipes do not give you seasonings to use. Remember to add appropriate seasonings (salt, pepper, paprika, herbs) to your dishes. I have become so wrapped up in doing all the steps of a new recipe correctly that I forget salt & pepper because it wasn't listed. Don't make my mistake.
3) Finding info: Speaking of seasonings, you may be unsure what types to use if it isn't listed. Check your cook books, online, and even the herb/seasoning containers for helpful info. You can find info about what types of proteins go well with different herbs or what type of seasoning is found in certain types of cuisine.
4) Lastly, if you're not sure of the instructions while reading the recipe, look for other recipes or tutorials to supplement. One of my Moussaka recipes has confusing instructions for making the Bechamel sauce. Luckily, I use a Bechemal type process for my homemade mac & cheese, so I used those instructions. Some one out there will explain the instructions in a way that works for you. Everyone understands differently.
I hope some of those were helpful or made you see you aren't alone in not getting something right the first or knowing info on all sorts of techniques and spices.
More crafting in the future - if I can get motivated to iron and cut fabric. I love sewing; I dislike the prep.
I would really like to do an Artist Alley at a convention or have a booth at an art fair sometime in the future; however, I need to practice more and come up with more designs. So, that is what I'm working on now.
Saturday, July 2, 2011
Hetalia Mochi Bean Bag and (yet) Another Stencil
Updating just as I promised ♥
For another gift I made a Hetalia mochi bean bag. Hetalia is a Japanese Anime, so you are not wrong in your confusion if you are someone that does not watch anime much or at all. For those who don't know: Hetalia is a show made of short segments where countries are given human forms and personalities, which are typically based off history and ridiculous stereotypes. It is a specific type of humor - lots of sarcasm, history metaphors, and jokes based on the crazy stereotypes people create. I don't recommend it if that type of humor is outside your comfort zone.
Now, I digress; the Hetalia characters have mochi (wiki it) forms. I made one character, France, from white flannel, plastic stuffing beads, thread, felt, stamp ink, and fabric paint pens.
The pattern is a circle for the bottom and 4 rounded triangle/half petal shapes. Google "mochi pattern" and you can find one if not multiple templates.
I used my sewing machine for the 4 triangles things and part of the sewing the circle to the connected 4 triangle things. I left an opening so I could flip the fabric right side out (since you sew things with the wrong sides facing out, so the seems and ugly stuff are later on the inside). I used the opening to poor in the beads too. After filling the mochi, I hand sewed the opening closed. After sewing the base was complete, I added details. I cut out a rose from red felt and sewed it to the bean bag. A mouth, eyes, and France's flag (on back) were added with fabric pens. Lastly, some cheek color was added using pink stamp ink.
I think it turned out cute. I would do his mouth a little better and not add fabric marker to the inked cheeks next time, but overall I was very pleased.


For another gift I made a Hetalia mochi bean bag. Hetalia is a Japanese Anime, so you are not wrong in your confusion if you are someone that does not watch anime much or at all. For those who don't know: Hetalia is a show made of short segments where countries are given human forms and personalities, which are typically based off history and ridiculous stereotypes. It is a specific type of humor - lots of sarcasm, history metaphors, and jokes based on the crazy stereotypes people create. I don't recommend it if that type of humor is outside your comfort zone.
Now, I digress; the Hetalia characters have mochi (wiki it) forms. I made one character, France, from white flannel, plastic stuffing beads, thread, felt, stamp ink, and fabric paint pens.
The pattern is a circle for the bottom and 4 rounded triangle/half petal shapes. Google "mochi pattern" and you can find one if not multiple templates.
I used my sewing machine for the 4 triangles things and part of the sewing the circle to the connected 4 triangle things. I left an opening so I could flip the fabric right side out (since you sew things with the wrong sides facing out, so the seems and ugly stuff are later on the inside). I used the opening to poor in the beads too. After filling the mochi, I hand sewed the opening closed. After sewing the base was complete, I added details. I cut out a rose from red felt and sewed it to the bean bag. A mouth, eyes, and France's flag (on back) were added with fabric pens. Lastly, some cheek color was added using pink stamp ink.
I think it turned out cute. I would do his mouth a little better and not add fabric marker to the inked cheeks next time, but overall I was very pleased.

 |
Kissy France face
Back of mochi.
Flag to indicate country - I didn't know if people would be able to tell
My second craft project for today.... Another Stencil!
This is actually the box I sent the gift in. I decorated the top with an image from the Ministry of Silly Walks.
I found the pattern through google [here]. The normal procedure followed: tracing, cutting, ironing, painting.
I don't recommend boxes for stenciling with freezer paper. The paper doesn't always want to come off. I figured it might be like that, but I didn't have anything else at the time.

The completed piece.
For those that may be interested in following me another way or just want to look at my photos of my projects, I have a Deviantart profile [right here].
If you plan on coming back for future posts, please follow through blogger, a reader, or on Deviantart. It will give me a better idea of my small reader group (friends, crafters, cookers, etc.).
Be back soon!
Friday, June 24, 2011
The Doctor Who scarf lives!
It has been about 4 months since I've updated, which is mostly due to school, finals, and graduation. I am now ready to start up again! I even have some posts lined up for this weekend and next week : )
Okay, so that Doctor Who, 4th Doctor, season 14 scarf. I did complete it and in a shorter time than I would expect. It is a simple knit stitch patter, so you get in a groove after a bit. Again, this scarf was reduced in size so it would be easier to wear. It is 2/3 the original width and length.
I am no longer in possession of this scarf because it was a gift (which went over well, yeah!). I do have pictures; unfortunately, I did not remember to take a picture after adding the tassels. I was upset with myself - the fringe = completion.
There was a bit of a mail scare with the scarf. In a desperate attempt to get a gift out on time, I made another season 14 DW scarf! This time it was 2/3 the original length and 1/2 the original width. I finished it in 3 days - my hands were quite exhausted. I do not have pictures yet; I must revive my camera first. Once I do you will be able to see the fringe.
Keeping with the Doctor Who theme, I present you with another Doctor Who stencil. I used a stencil pattern found on Crafty Tardis livejournal. This time, however, I made a tote bag.
Same process as in my earlier post [here], but I started at the tracing step because I already had a pattern.
Here is the finished project:
 |
| Before I weave in the ends of the stripes |
I am no longer in possession of this scarf because it was a gift (which went over well, yeah!). I do have pictures; unfortunately, I did not remember to take a picture after adding the tassels. I was upset with myself - the fringe = completion.
 |
| Completed (w/out fringe) |
Keeping with the Doctor Who theme, I present you with another Doctor Who stencil. I used a stencil pattern found on Crafty Tardis livejournal. This time, however, I made a tote bag.
Same process as in my earlier post [here], but I started at the tracing step because I already had a pattern.
 |
| Bag was pre-made and purchased at Michael's |
Thank you to anyone still following me for sticking around!
Things to look forward to: a cooking post, plushies, and my first successfully sewn costume (cosplay for those in the know) piece
Subscribe to:
Posts (Atom)