Saturday, December 3, 2011

Project Photo Dump

I have a couple photos of some projects I have worked on. No tutorials or anything, sorry.

Crafting:

 Another Doctor Who scarf!  The knitting is actually 100% done (not 75% like when this pic was taken), but edges and tassels still need to be done. This is a full size version of Season 14 with the 4th Doctor - it is much larger than pictured.


Hello Kitty Plush/Stuffed Animal - I made this from felt, thread, and poly fiber fill (fluff).  I sewed it together using a blanket stitch and a whip stitch.

Back of Hello Kitty

Cooking:


Sushi! It came out okay for my first attempt ever, but definite improvements to be made.  It is supposed to be a California Roll, so it is made of rice, nori, avocado, imitation crab meat, and cucumber.

Fun Geeky Hobbies:


I bought this D Gray Man puzzle at a convention. 1000 pieces way too much black, grey, and navy! I could only do the puzzle by natural sun light because the colors were too close and the indoor lights put a glare on the pieces.  It took me forever to finish, but I did it and it glowed in the dark.

I have a couple more pictures and will be working on some sewing - clothes - projects soon.


Saturday, November 26, 2011

Long Time with No Posts

It has been a long time since I have posted anything new - sorry about that.
Work hasn't left me much time to cook and I was asked for a 4th Doctor scarf, so I've been working on that.

I have a whole bunch of photos of past projects I need to upload, so look out for those in the next week.

New projects, mostly crafting, to come in the near future. Mostly sewing projects.

Thanks for sticking around!

Wednesday, August 17, 2011

Fleece Blanket

For my sister's birthday, part of my gift to her was a home sewn blanket.

We were at Hancock's Fabric and she found a dinosaur printed fleece she liked, so I offered to make something out of it.  I have a flannel blanket with a silky border, which needs repairs it is so old, and she asked for a blanket like that.

Unfortunately, I forgot to take progress pictures, but I plan on making another one around Christmas.  Then I'll remember the progress photos... hopefully.


Fleece Blanket:


1.5 yards of fleece or flannel
2 packages of blanket binding/border
Thread matching blanket binding
Sewing Machine

I did an extremely simple blanket.  I had 1.5 yards of my sister's chosen fabric cut.  I left it in the shape it was in from the store - my sister approved of the shape, since it was large enough to cover her.

I purchased blanket binding in a color that went with the colors in the fabric; I purchased only one package at first, but found later that I needed two. My process for attaching the binding will be different on my next blanket.

Construction:
1) Lay out the fabric so it is flat. Iron flannel if necessary, be careful with fleece - it can burn

2) Pin binding to fabric. Make sure not to bunch fabric or pull to tight. The fold of the binding should match up and touch the edge of the fabric, so all the binding is on top of fabric.
Instructions I found say start pinning on a side not a corner, but I don't really like the look of a seem in the middle. I haven't tried starting at a corner, so I can't honestly suggest it.

3) Corners take a little practice. I'll post how to pictures next time since I'm sure my instructions won't be clear. Anyway, on both sides of the blanket, fold fabric over so it makes a point  over the corners point.  There will be a fold line down the middle of the corner. Doing this on one side should  cause the other side to do the same thing, but, if not, then repeat.

4) Finish pinning all the way around


5) Sew the binding on. I used a normal straight stitch, but I meant to use a zig-zag stitch to keep the edge of the binding from flapping up. My sister didn't care, so I kept the straight stitch at 1/4 inch from the edge of the binding.


When I revive my camera, I will take pictures of the corners.  Then I will add a better how-to for blanket binding corners.

I won't be cooking much in the near future due to my work hours, but I do have some past sewing and crafts I am going to try to post more regularly.  I also found this great knitting book, so I have that to work on as well as my Halloween costume.

Sunday, July 17, 2011

Cute Fabric Bows

I have an obsession with cute things, especially accessories, clothes, and fabrics.

Bows fall in that category. This is what led me to making my own bows out of my fabric scraps.

Sewing bows is actually much easier than it might seem; at least I thought it would be harder.


Above are the bows I have made so far.  The argyle and brown/tan bows were the first two I made. The fabric is a little loose around the middle, but practice makes perfect.

The bows don't have anything attached to them, which makes them a versatile accessory.  You can slip a bobby pin through the fabric loop for a hair bow or use a safety pin to attach the bow to a bag or outfit.

To make the bows I went through a process similar to that of making a tiny pillow except, after flipping the fabric pouch right-side out, I sewed the hole closed without filling the pouch will fluff.

The square/rectangle was then folded or scrunched and sewed down in the middle in order to get the bow shape. Lastly, a thin piece of fabric was wrapped and sewn around the middle of the bow.

There are real tutorials and patterns around the net. The patterns range in materials and skill level required - there are even no-sew an minimum sewing tutorials - so find the tutorial that is right for you if you are interested in the little DIY project.

In the future, after some more practice, I might try selling these with some of my other craft projects. I'm going to try adding details - like button charms, lace, ruffles, etc. - in order to create different styles.

Speaking of details...
I went craft supply shopping a couple times this week. There were sales and coupons that demanded my attention.

I came out with a decent haul that will help in my goal to create a crafting stock pile.

Fabric: Fleece, flannel, and felt. Rose fleece was on $2 a yard!

New storage box and patterns ($1.99 yeah!)

Crochet hooks, buttons, ribbon, thread, needles, and binding

Up close view of my cute buttons

I'm looking forward to using my new supplies. So many possibilities.

I leave you with pictures of my bows in use:


Next time: Fleece blanket

Friday, July 15, 2011

Striped Birthday Cake

I lied - more food!

It was my sister's birthday, so I made her cake.  We came across this tutorial for making a vertical striped cake and thought we'd attempt it for her bday.

Since this was a new technique, I save myself some trouble and just used boxed cake mix and canned icing.  I even bought Betty Crocker Cupcake Icing to decorate.

It didn't come out as nice as the tutorial because I am not an amazing baker. I'm good, but I don't have awesome skills.

First I made round cakes. My 2 boxes of mix made four 8 inch cakes, you will have 2 cakes or just extra cake at the end.
I used strawberry and chocolate cake.

After baking, removing from pans, and cutting off the tops to make the cake flat, I stacked cakes of the same flavor on top of each other (both strawberries together & chocolate together) and put them in the freezer to cool.

After freezing for a couple hours (3, I think), I took out the cakes and cut them into circles, so the cake looked like a bullseye.  Next time I will make a proper template; for this first attempt I tried measuring, which didn't work out. I had a gap I had to fill because my measurements were a little off from one cake to the other.

After cutting, I switched alternating colors between the cakes. Now you have a bullseye with alternating colored rings. I wrapped the cake in saran wrap and put in the freezer to try and mold the cake together. That didn't really work, mostly because my circles didn't fit each other properly.

After an hour in the freezer, I took the cake out. If frozen, thaw cake in the refrigerator; if not (like mine), go ahead and add icing.

I spread on white icing as normal, but tried to add decoration with the Betty Crocker Cupcake Icing in pink.  The Cupcake Icing is a whipped cream like can of icing. It comes with decorating tips, so you can try different designs.  It worked okay.  The tips worked perfectly and the icing tastes great; however, I had trouble stopping the flow of icing once it got started. This caused some extremely messy designing.  Fortunately, the cake was tasted good enough for my sister to forgive the mess.
If I was to use that pressurized icing again, I would first have to figure out how to control the flow better.

Now for a bunch of pictures:

Decorated
The whole cake


Border

Details and sprinkles

The inside:

The first piece served


Half the cake

 The candles:
I found special "Rainbow Glow" candles at the grocery store. The burn colors!

Back row, L to R: White, Green, Red
Front Row, L to R: Orange, Blue

Next time I try a cake pattern I am going to do a checkered sheet cake.

Next post will be crafty. I got a great haul from a craft store shopping out, so I'll be showing that off with some completed projects.
Then... probably more food in the near future. My friend and I want to have a Harry Potter themed baking day. The movie release has been quite inspiring!

Sunday, July 10, 2011

Mousakka & Recipe Tips

I haven't written about cooking in a long time, so I'd do a small post.

Fun cooking has not been happening lately because I usually bake for fun, and there has been a constant supply of baked goods lately.

I did make Moussaka a couple of weeks ago. I absolutely love mousakka.
Moussaka is a dish made up of layers of eggplant and minced/ground meat as well as tomato paste or sauce. The is also, typically, a Bechamel sauce on top. There are multiple variations depending on the chef and origin of the recipe.

For my version of Moussaka, I mix recipes.  Therefore, I do not have a recipe to share - sorry.  I have compiled the parts of different recipes I use into one.  I will do that next time though, it would probably be helpful and cut done cooking time, haha.

I remembered to take a picture of my finished product... of leftovers the next day.  It isn't as pretty as when it came out of the over; plus, it isn't melty and gooey looking since it is cold.


It was delicious!

Since I have to recipe to share, I thought I'd share some tips for recipes.

1) Improvise if you feel comfortable - If you don't like something in the recipe or would like something added, do it.  Recipes are a lot of testing and altering when you are trying a new one, so you might as well try the changes you'd like.

2) Check for seasoning in recipes: Sometimes recipes do not give you seasonings to use.  Remember to add appropriate seasonings (salt, pepper, paprika, herbs) to your dishes. I have become so wrapped up in doing all the steps of a new recipe correctly that I forget salt & pepper because it wasn't listed. Don't make my mistake.

3) Finding info: Speaking of seasonings, you may be unsure what types to use if it isn't listed. Check your cook books, online, and even the herb/seasoning containers for helpful info.  You can find info about what types of proteins go well with different herbs or what type of seasoning is found in certain types of cuisine.

4) Lastly, if you're not sure of the instructions while reading the recipe, look for other recipes or tutorials to supplement.  One of my Moussaka recipes has confusing instructions for making the Bechamel sauce. Luckily, I use a Bechemal type process for my homemade mac & cheese, so I used those instructions.  Some one out there will explain the instructions in a way that works for you. Everyone understands differently.

I hope some of those were helpful or made you see you aren't alone in not getting something right the first or knowing info on all sorts of techniques and spices.

More crafting in the future - if I can get motivated to iron and cut fabric. I love sewing; I dislike the prep.
I would really like to do an Artist Alley at a convention or have a booth at an art fair sometime in the future; however, I need to practice more and come up with more designs. So, that is what I'm working on now.

Saturday, July 2, 2011

Hetalia Mochi Bean Bag and (yet) Another Stencil

Updating just as I promised ♥

For another gift I made a Hetalia mochi bean bag.  Hetalia is a Japanese Anime, so you are not wrong in your confusion if you are someone that does not watch anime much or at all. For those who don't know: Hetalia is a show made of short segments where countries are given human forms and personalities, which are typically based off history and ridiculous stereotypes. It is a specific type of humor - lots of sarcasm, history metaphors, and jokes based on the crazy stereotypes people create. I don't recommend it if that type of humor is outside your comfort zone.

Now, I digress; the Hetalia characters have mochi (wiki it) forms. I made one character, France, from white flannel, plastic stuffing beads, thread, felt, stamp ink, and fabric paint pens.

The pattern is a circle for the bottom and 4 rounded triangle/half petal shapes.  Google "mochi pattern" and you can find one if not multiple templates.
I used my sewing machine for the 4 triangles things and part of the sewing the circle to the connected 4 triangle things. I left an opening so I could flip the fabric right side out (since you sew things with the wrong sides facing out, so the seems and ugly stuff are later on the inside). I used the opening to poor in the beads too.  After filling the mochi, I hand sewed the opening closed.  After sewing the base was complete, I added details. I cut out a rose from red felt and sewed it to the bean bag.  A mouth, eyes, and France's flag (on back) were added with fabric pens.  Lastly, some cheek color was added using pink stamp ink.

I think it turned out cute. I would do his mouth a little better and not add fabric marker to the inked cheeks next time, but overall I was very pleased.


Kissy France face


Back of mochi. 
Flag to indicate country - I didn't know if people would be able to tell


My second craft project for today.... Another Stencil!

This is actually the box I sent the gift in. I decorated the top with an image from the Ministry of Silly Walks.
I found the pattern through google [here].  The normal procedure followed: tracing, cutting, ironing, painting.
I don't recommend boxes for stenciling with freezer paper.  The paper doesn't always want to come off.  I figured it might be like that, but I didn't have anything else at the time.

The completed piece.

For those that may be interested in following me another way or just want to look at my photos of my projects, I have a Deviantart profile [right here].

If you plan on coming back for future posts, please follow through blogger, a reader, or on Deviantart.  It will give me a better idea of my small reader group (friends, crafters, cookers, etc.).

Be back soon!

Friday, June 24, 2011

The Doctor Who scarf lives!

It has been about 4 months since I've updated, which is mostly due to school, finals, and graduation. I am now ready to start up again! I even have some posts lined up for this weekend and next week : )

Before I weave in the ends of the stripes
Okay, so that Doctor Who, 4th Doctor, season 14 scarf. I did complete it and in a shorter time than I would expect.  It is a simple knit stitch patter, so you get in a groove after a bit.  Again, this scarf was reduced in size so it would be easier to wear.  It is 2/3 the original width and length.

I am no longer in possession of this scarf because it was a gift (which went over well, yeah!). I do have pictures; unfortunately, I did not remember to take a picture after adding the tassels. I was upset with myself - the fringe = completion.

Completed (w/out fringe)
There was a bit of a mail scare with the scarf.  In a desperate attempt to get a gift out on time, I made another season 14 DW scarf!  This time it was 2/3 the original length and 1/2 the original width.  I finished it in 3 days - my hands were quite exhausted. I do not have pictures yet; I must revive my camera first.  Once I do you will be able to see the fringe.

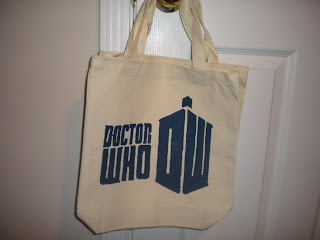
Keeping with the Doctor Who theme, I present you with another Doctor Who stencil.  I used a stencil pattern found on Crafty Tardis livejournal.  This time, however, I made a tote bag.
Same process as in my earlier post [here], but I started at the tracing step because I already had a pattern.


Here is the finished project:
Bag was pre-made and purchased at Michael's

Thank you to anyone still following me for sticking around!

Things to look forward to: a cooking post, plushies, and my first successfully sewn costume (cosplay for those in the know) piece

Tuesday, February 22, 2011

The Beginning: the 4th Doctor's Scarf

And so it begins - my 4th Doctor scarf!

I chose the season 14 version


Well, it took forever to get started because I restarted a couple times. First time because I had to change a color to one I liked better, the second time because I decided an everyday size would get more use than the actual size, and the last time because I didn't like the needle size. In other word, I was being a picky perfectionist - if you were questioning my type A personality, you probably aren't now.

I took a long time to start this project because finding the right colors was crucial if I wanted colors close to the real 4th Doctor's scarf. I also didn't want to order online, so I had to use what was available locally. Luckily the site I use for my pattern, Witty Little Knitter, has suggestions. Tara Wheeler, the woman who runs the site and put the pattern together, was great enough to list different brands and color suggestions. If you are interested in knitting any 4th Doctor scarf you should check out her site!

I'm using an orange color instead of the red pictured
I chose to use Vanna's Choice yarn. Once I had all my yarn I got started on the pattern.  I am now using size 9 needles after trying 7 and 8s. If I do this again I will most likely use 10s because it seems like my scarf is going to be shorter than I wanted.

Speaking of shorter, I did decrease the pattern in order to make it more everyday friendly.  I decreased the width and all the stripes by 1/3 their original sizes so I could maintain the original proportions as much as possible.

25% done so far! The light in my living room is awful, so the colors are off *sigh*

Need to weave in those tails!

I'll make sure to update my progress bar as I go - in case anyone is interested - but I'll probably only do weekly picture update.

Next up is working on a crafting project for my writing class. I have to do a demonstration;  mine is going to be a freezer paper stencil.


Sunday, February 13, 2011

Cereal Cookies

The cookie post has finally arrived!

It took so long for me to make this recipe because I didn't have any cookie friendly cereals in my house and then I kept forgetting to buy some.

The cereal cookie recipe is 2 parts - the cereal crunch and the cookie dough. The recipe I used was derived from an interesting one I found in last month's InStyle magazine.  The recipe author uses cereals in different recipes and I thought her cookie one looked really cool.  The picture with the recipe showed whole piece of Cap'n Crunch sticking out - that finalized my plans.  I edited the recipe because I felt it called for way too much of the ingredients for a recipe making 12 cookies.

**Notes: This is a salty & sweet treat. If you don't like the salty and sweet mixed, I would recommend decreasing the salt in the cereal bit and/or dough part. It also came out very buttery/oily.  I'll probably cut the butter next time. 3/4-1 stick in the bits and 1 1/2 in the batter.
The original said it was for 12 cookies, but I ended up with 17 large cookies and 1 tiny baby cookie.

The cereal bits:

Watch for sneaky fingers - this stuff will disappear, eaten by nibblers

* The following measurements made much more than I needed, but I saved it because I think it might be good with some ice cream

4 cups Cap'n Crunch (off brand is fine off course, I used it)
3 to 4 cups Fruity Pebbles (again, off brand is fine)
1 stick of unsalted butter (8 Tbsp)
4 tbsp nonfat dry milk powder
1 1/3 tsp salt

1) Preheat oven to 250 degrees F
2)Melt butter in bowl using microwave. 45 to 50 secs will usually get it done.
3) In separate bowl mix all the dry other ingredients
4) Add butter to dry ingredients & toss to coat
4) Cover baking sheet w/ parchment paper or aluminum foil
5) Layer cereal mix on baking sheet
6) Bake for 35 - 40 minutes


Dough

* The magazine recipe called for 2/3 cup granulated sugar and 3/4 light brown sugar, but I ran out of white

2 sticks of unsalted butter (16 Tbsp) at room temperature
1/3 cup white granulated sugar
3/4 cup + 1/3 cup light brown sugar
1/2 tsp vanilla extract
1 large egg
2 cups all purpose flour
1/4 tsp baking soda
1/2 tsp baking powder
1 tsp salt
Cereal bits

1) In a mixer or with hand mixer, beat butter and sugar (white and brown) until creamy and fluffy
2) Add vanilla and egg, blend in
3) Add remaining cereal, fold in by hand so the pieces don't get too broken up - I wanted to be able to see the normal shape of the cereal pieces
4) Roll dough into balls of the same size and place on a baking sheet. Bigger the ball, thicker the cookie. Space out so cookies have room to spread as they cook (unless you want a giant cookie sheet).
5) Refrigerate for 1 hour
6) Preheat over to 350 degrees F
7) Bake 15 minutes or until golden brown
8) Cool.


Again, the original recipe that I altered was done by a chef interviewing with InStyle. If you want the original look for last month's issue of InStyle or check there website.

Now go enjoy some cookies!

Thursday, February 10, 2011

Pseudo-Ramen

Sorry still no cookies. I actually went to the grocery store and forgot my list for the recipe. *sigh* I made another trip though, so here should be a cookie post in the next couple of days.

For my cooking lovers I offer something different.
Last week there were no family dinner plans, so I went through the fridge and pantry to see what I could whip up. I'd always wanted to try to cook a simplified version of authentic, not instant, ramen (google pictures of it if you've don't know anything about it).  I was successful in scrounging up some usable ingredients.

My dinner:


Please excuse my lack of measurements. I eye-balled as I cooked and used my personal taste. This is also my first recipe with no base recipe used, so I'm not really sure how to explain everything in the best, easiest to understand manner.

Ingredients: Recipe made 5 servings - honestly, it depends on how much you eat in one serving though
3 cups beef broth
about 1 lb of beef (I had stir fry quality beef on hand)
2 packs of instant ramen noodles (don't need seasoning packs)
Soy Sauce
Garlic, minced
White mushrooms
Canola oil
Frozen green peas, cooked
Canned baby corn
Nori (dried seaweed), cut into pieces
Imitation crab meat strips, cut into small strips
salt
white pepper
ground ginger
minced dried onion

1) Boil water for ramen in a sauce pan (size depends on how much you are making)
2) In large pot, heat oil over medium heat
3) Add garlic, about 1.5 teaspoons or to your taste preference, and small package of pre-sliced mushrooms
4) Saute mushrooms and garlic until mushrooms are cooked - soft and a golden color
5) In skillet, heat canola oil over medium heat.
6) Add beef, cook until done (depending on how you like your beef). Set beef aside.
7) Optional: Save beef juice for broth
5) Add beef broth to pot w/ garlic and mushrooms, let it simmer
6) Add about 3/4 teaspoon of ground ginger, 1 tsp minced dried onion, salt and pepper to taste
7) Mix in the spices, add about 2 tablespoons of soy sauce.
8) Optional: stir in beef juice
9) Stir and keep on low-medium heat
8) Water should be boiling, add instant ramen noodles and follow cooking time instructions on the package.
9) After noodle cook, DO NOT add the seasoning packets. Drain the noodles. Set aside.
10) Take broth off heat. Serve ramen.

Serving:
I put all the vegetable and protein (crab and beef) on top like ramen you see in pictures. This also helped feed everyone, since my family all like different veggies and toppings.
NOTE: Toppings can be added and subtracted based on what you like.

In a bowl I put in noodles, then poured over broth (with mushrooms) until noodles were about 3/4 covered. On top I put slices of beef, crab, corn, peas, and seaweed in sections on top.

I hope that was at least partially decipherable.

Howl & Sophie

My Cross-stitch project is complete!!

Late last spring I found a ton of free cross-stitch patterns based off anime shows and films. They were all created by a screen name littlemojo, but, unfortunately, her site was no longer up and working.  A bunch of fans shared the patterns they had saved, but, on another unfortunate note, those websites are no longer running. Luckily I was able to pull a few before everything disappeared.

I am a huge Studio Ghibli fan, so I chose Howl's Movie Castle as my first project's theme.  The pattern is a movie still of Sophie and Howl with the background removed; it is from the beginning of the film if you are wondering.


This was the first cross-stitch of this scale that I have completed.  Usually, I just stick to small Christmas ornaments - easy and quick.  This is 151 x 91 stitches; it took me about 4 months to complete if I take out all the months I wasn't able to work on it.


Here is the halfway (-ish) mark:


The Completed Piece (Victory!):


I really love this pattern, so I decided to keep it, instead of gifting it like I often do with my crafts.  There is a special in town for cross-stitching and framing, so I'll probably go by there in the near future to get it backed and framed.


If you are interested in this pattern or patterns from this genre of entertainment, leave me a comment and I'll try to help you find what you are looking for.


Movie Side Note: If you like animation and fantasy, this is a beautiful and great film that you should see. It is actually based on children's book. I recommend the book as well. The two mediums differ greatly, but this is a case where neither is less satisfying because they are both great enough to stand alone and have their different stories.


Next crafting related post will be about the start of the formidable Doctor Who scarf. Actually, it isn't that formidable anymore now that I've edited the pattern for everyday wear. Expect it in the next couple of days Doctor Who fans.

Sunday, January 30, 2011

Cross Stitch Project Complete!

Sorry for the lack of updating!
I promise there really is a cookie post in the near future. It's just that there is a lack of ingredients and food in my house and no time for serious grocery shopping.

Now onward to the topic of the blog post:
I completed the cross stitch project I've been working on for the longest time!

I will take pictures when there is better light tomorrow - then there will be a proper post.
I just needed to celebrate the crafting victory.

Next on the list: the Doctor Who scarf

Friday, January 21, 2011

First Cooking Post: Chicken Tenders & Fries!

Finally, my first cooking related entry.

A healthier version on chicken tenders and fries was the endeavor. It was a success!

I used a Weight Watchers recipe and it was quite delicious.
Instead of using a batter and frying, this recipe calls for bread crumbs and baking.  I was surprised at how much flavor the chicken had. The fries were also baked after being coated in a small amount of vegetable oil - also tasted delicious.

Since the recipe isn't really free unless you have a membership, I'm not going to post the actual recipe.  In the future I will post any recipes I create and link to free ones around the web.

However, the recipes are pretty basic.
Fries - cut up potatoes, drizzle with oil, toss, season, bake
Chicken - coat in something moist (eggs, sauce, whatever you usually use), coat in bread crumbs, bake

Here is a picture of my outcome:


Not a post high in how-to or info, but the next cooking entry should be - it's cookies! (once I make them)

Crafting Update:
I've worked some more on my cross-stitch patter. At this pace it should be done by next weekend!

The scarf project starts this weekend! I know my bar says there is a smidge of work done, but I just gave myself credit for picking out all the yarn and supplies. Choosing matching yarn colors is harder than you think so I believe it deserves some recognition, haha.

This blog has definitely given me more drive to work on my craft projects. I hope I can keep it up.

Saturday, January 15, 2011

An Old Project + A New, Epically Long One

My new goal is to finish craft projects I start instead of forgetting about them.
In line with this new goal, I have taken a cross-stitch project out of the closet with the plans to finish it.  I started the pattern about 8 months ago, but there were about 4 months were no actual work was done.  This is only my 4th cross-stitch project and it happens to be quite large for an amateur like be - so it is taking a while.

I like working on long term projects while I work on smaller or mostly completed projects to break up the routine. As I have no long term project, so it is time to pick a new one!

My new project is.....
Knitting a 4th Doctor Scarf!

Yes, it is another Doctor Who craft.
I might cook everything, but I craft geek - just for your future knowledge.

I have put progress bars in the side bar at the left so you can all follow my progress (if you care). I'll probably post about the scarf as I go. However, the cross-stitch project won't have a post until it is complete due to there not being much to write about during the process.

Before I leave you:
I apologize for not having any cooking experiences to share so far.  I really need to restock the kitchen in my house so there will be actually food to cook. Cooking posts to come soon, though, as I am going grocery shopping tomorrow.

Monday, January 10, 2011

Doctor Who Stencil Art - Canvas

My first crafting post!
Please excuse my writing style and way of explaining things. This is my first blog and I wouldn't be surprised if some parts sound confusing as I learn how to explain on and write a blog better.

Now back to the craft!

I wanted to give my friend a Christmas/Going Away gift before she left to study abroad, so it had to be something good.  *Idea* - Doctor Who themed gift. We are both huge Doctor Who fans and often spend our down time when working on our campus programming board discussing all things related.

My inspiration came from a Craftster post I saw while searching for ideas. (Check it our Here)
I loved what this person, taerowyn on Craftsrer, did and thought I could do an amateur version for a gift.

My process:

Unfortunately, I had a brain lapse and forgot to take pictures during the process. That would be more helpful, right?

For stenciling, this is my second attempt, I use the handy kitchen supply known as Freezer Paper. Freezer paper is waxy on one side and paper on the other. The paper side is perfect for sketching patterns and the wax side sticks to what you want to stencil on when ironed.

First, I found pictures/photos I wanted to stencil.  I decided to do the 3 most recent Doctors (9, 10, & 11) and the Tardis (If you are not a Doctor Who fan, ignore those words and just know that is 4 pictures).
I do not own Photoshop software of any level, so I had to use Microsoft Word to change the photos into Black & White pictures.

Example:


Next was tracing the picture onto the paper side of the Freezer Paper. As you can see there is a lot of black on that photo and it distorts the edges, so I had to get creative and compare pictures for an idea of where the edges of the face and hair should be.  

After tracing I cut out the parts that were black in the B&W photo with an Exacto knife. That was a learning experience and, no worries, no one was harmed during this craft project!

As I mentioned earlier, Freezer Paper can be ironed on to many things temporarily. I ironed on the Freezer Paper stencil to the canvas and used a sponge brush to dab on black paint. After the paint dried I peeled of the paper and ... WA-LA, art! 

**Something learned from the project: While stenciling is now one of my more favorite crafting techniques, canvas does not make a nice seal with Freezer Paper. I had to re-do my Tardis because the first version's paint bled and feathered everywhere.

Finished Product:

Isn't my orange desk a lovely background.

I hope to have another craft or cooking project ready soon! 
I also plan on learning how to better layout and manage this blog so it looks more appealing... we will see.


Monday, January 3, 2011

Starting Over

I found that a blog about random things in my life doesn't work for me - my life is pretty normal and average. However, over the last year I've been doing a lot of crafting and cooking. I like sharing my projects, so I plan to start this blog (which really never got off the ground) over.

I have a finished project that I actually took pictures of *gasp* (I rarely remember) and that'll be my first post in a couple of days.

New year, new blog!